Step-by-Step Guide for Setting Up a PPTP-based Site-to-Site VPN Connection in a Test Lab
This guide provides an example with detailed information about how you can use five computers in a test lab environment to configure and test a Point-to-Point Tunneling Protocol (PPTP)-based site-to-site VPN connection using any 32-bit version of the Microsoft® Windows Server™ 2003 operating system with Service Pack 1 (SP1) as well as the Microsoft Windows® XP Professional operating system with Service Pack 2 (SP2).You can use this example deployment to learn about Windows Server 2003 with SP1 site-to-site VPN functionality before you deploy a site-to-site VPN connection in a production environment. This test lab configuration simulates a deployment of a PPTP-based site-to-site VPN connection between the Seattle and New York offices of an organization
Note
The following instructions are for configuring a test lab using a minimum number of computers. Individual computers are needed to separate the services provided on the network and to clearly show the functionality. This configuration is designed to reflect neither best practices nor a recommended configuration for a production network. The configuration, including IP addresses and all other configuration parameters, is designed to work only on a separate test lab network.
Setting Up the Test Lab
The infrastructure for a PPTP-based site-to-site VPN deployment test lab network consists of five stand-alone computers performing the roles shown in Table 1. Each computer is part of a workgroup. None of the computers are joined to a domain. In this test lab scenario, Windows Firewall is installed and turned-on automatically on the client computers running Windows XP Professional with SP2. You will configure a Windows Firewall exception on CLIENT1, allowing communication between the two client computers. On the three computers with Windows Server 2003 with SP1, Standard Edition, Windows Firewall is automatically installed, but it is not turned-on by default. On these computers, Windows Firewall will remain turned-off. In addition, the Windows Firewall/Internet Connection Sharing (ICS) service should be disabled on each of these computers.
 In addition to these five computers, the test lab also contains four hubs (or Layer 2 switches):
· A hub that connects the Seattle office (CLIENT1) to the answering router (ROUTER1).
· A hub that connects the New York office (CLIENT2) to the calling router (ROUTER2).
· A hub that connects the answering router (ROUTER1) to the Internet router (INTERNET).·
A hub that connects the calling router (ROUTER2) to the Internet router (INTERNET).
Note
Because there are only two computers on each subnet, the hubs can be replaced by Ethernet crossover cables.The configuration of this test lab is shown in the following figure:
 Configure your test lab by performing the following tasks:
1. Configure the client computers in the Seattle and New York offices.
2. Configure the computers performing as the answering and calling routers.
3. Configure the computer performing as the Internet router.
CLIENT1 is a client on the Seattle office subnet, running Windows XP Professional with SP2.
Configure TCP/IP properties
1. Open Network Connections, right-click the network connection you want to configure, and then click Properties.
2. On the General tab, click Internet Protocol (TCP/IP), and then click Properties.
3. Click Use the following IP address, type 172.16.4.3 for the IP address, type 255.255.255.0 for the Subnet mask, and then type 172.16.4.1 for the Default gateway.
Installing Windows XP Professional with SP2 turns on Windows Firewall by default. You will need to configure port exceptions on the firewall allowing for communication between CLIENT1 and CLIENT2.
Configure Windows Firewall on CLIENT1
1. Click Start, point to Control Panel, and then click Security Center.
2. Click Windows Firewall, and then in the Windows Firewall dialog box, click the Advanced tab.
3. Click Settings for ICMP, and then click Allow incoming echo request.
4. Click OK twice to close Windows Firewall.
1. Click Start, point to Control Panel, and then click Security Center.
2. Click Windows Firewall, and then in the Windows Firewall dialog box, click the Advanced tab.
3. Click Settings for ICMP, and then click Allow incoming echo request.
4. Click OK twice to close Windows Firewall.
CLIENT2 is a client on the New York office subnet, running Windows XP Professional with SP2. Installing Windows XP Professional with SP2 turns on Windows Firewall by default. However, because CLIENT2's only role is as a calling computer, Windows Firewall does not need to be enabled with any exceptions. Leave the default Windows Firewall settings on CLIENT2.
Configure TCP/IP properties
1. Open Network Connections, right-click the network connection you want to configure, and then click Properties.
2. On the General tab, click Internet Protocol (TCP/IP), and then click Properties.
3. Click Use the following IP address, and then type 172.16.56.3 for the IP address, type 255.255.255.0 for the Subnet mask, and then type 172.16.56.1 for the Default gateway.
This section describes the setup for the routers in the test lab. For information about configuring routing and remote access for the answering router (ROUTER1) and the calling router (ROUTER2), see “Configuring a PPTP-based Site-to-Site VPN Connection” in this guide.
ROUTER1 is a computer on the Seattle office subnet, running Windows Server 2003 with SP1, Standard Edition. ROUTER1 is acting as the answering router.
Configure TCP/IP properties
1. Open Network Connections, right-click the network connection you want to configure, and then click Properties.
2. On the General tab, click Internet Protocol (TCP/IP), and then click Properties.
3. Configure the IP address and subnet mask with the following values:
a. On the To the Internet interface, type 10.1.0.2 for the IP address, type 255.255.0.0 for the Subnet mask, and then type 10.1.0.1 for the Default gateway.
b. On the To the Seattle intranet interface, type 172.16.4.1 for the IP address, type 255.255.255.0 for the Subnet mask. Leave the Default gateway clear.
Windows Firewall and Routing and Remote Access cannot run simultaneously on VPN1. If Windows Firewall is turned on, you will need to disable it. If the Windows Firewall/Internet Connection Sharing (ICS) service has started or is set to automatic before configuring Routing and Remote Access, you must disable it.
Disable the Windows Firewall/Internet Connection Sharing (ICS) service
1. Click Administrative Tools, and then click Services.
2. In the Services details pane, right-click Windows Firewall/Internet Connection Sharing (ICS) service, and then click Properties.
3. If the service Startup Type is either Automatic or Manual, change it to Disabled.
4. Click OK to close the Windows Firewall/Internet Connection Sharing (ICS) dialog box, and then close the Services page.
ROUTER2
ROUTER2 is a computer on the New York office subnet, running Windows Server 2003 with SP1, Standard Edition. ROUTER2 is acting as the calling router.
Configure TCP/IP properties
1. Open Network Connections, right-click the network connection you want to configure, and then click Properties.
2. On the General tab, click Internet Protocol (TCP/IP), and then click Properties.
3. Configure the IP address and subnet mask with the following values:
a. On the To the Internet interface, type 10.2.0.2 for the IP address, type 255.255.0.0 for the Subnet mask, and then type 10.2.0.1 for the Default gateway.
b. On the To the Seattle intranet interface, type 172.16.56.1 for the IP address, type 255.255.255.0 for the Subnet mask. Leave the Default gateway empty.
As with ROUTER1, you must turn off Windows Firewall on ROUTER2 and disable the Windows Firewall/ICS service.
Disable the Windows Firewall/Internet Connection Sharing (ICS) service
1. Click Administrative Tools, and then click Services.
2. In the Services details pane, right-click Windows Firewall/Internet Connection Sharing (ICS) service, and then click Properties.
3. If the service Startup Type is either Automatic or Manual, change it to Disabled.
4. Click OK to close the Windows Firewall/Internet Connection Sharing (ICS) dialog box, and then close the Services page.
Configuration for the Internet Router
INTERNET is a computer running Windows Server 2003 with SP1, Standard Edition.
Configure TCP/IP properties
1. Open Network Connections, right-click the network connection you want to configure, and then click Properties.
2. On the General tab, click Internet Protocol (TCP/IP), and then click Properties.
3. Configure the IP address and subnet mask with the following values:
a. On the To Router1 interface, type 10.1.0.1 for the IP address, and then type 255.255.0.0 for the Subnet mask.
b. On the To Router2 interface, type 10.2.0.1 for the IP address, and then type 255.255.0.0 for the Subnet mask.
4. Click Administrative Tools, and then click Routing and Remote Access to open the Routing and Remote Access Microsoft Management Console (MMC) snap-in.
5. In the Routing and Remote Access snap-in, right-click INTERNET (local) in the console tree, and then click Configure and Enable Routing and Remote Access.
6. The Routing and Remote Access Server Setup Wizard opens. Click Next.
7. On the Configuration page, select Custom configuration, as shown in the following figure.
8. Click Next. On the Custom Configuration page, select LAN routing, as shown in the following figure.
9. Click Next. On the Completing the Routing and Remote Access Server Setup page, click Finish, and then click Yes to start the service.
 8. Click Next. On the Custom Configuration page, select LAN routing, as shown in the following figure.
9. Click Next. On the Completing the Routing and Remote Access Server Setup page, click Finish, and then click Yes to start the service.
Make sure that Windows Firewall is turned off and that the Windows Firewall/Internet Connection Sharing (ICS) service is disabled.
Disable the Windows Firewall/Internet Connection Sharing (ICS) service
1. Click Administrative Tools, and then click Services.
2. In the Services details pane, right-click Windows Firewall/Internet Connection Sharing (ICS) service, and then click Properties.
3. If the service Startup Type is either Automatic or Manual, change it to Disabled.
4. Click OK to close the Windows Firewall/Internet Connection Sharing (ICS) dialog box, and then close the Services page.
Verify the routing infrastructure
1. On ROUTER1, ping the IP address 10.2.0.2. This should be successful.
2. On CLIENT2, ping the IP address 172.16.4.3. This should be unsuccessful because CLIENT1 cannot be reached by CLIENT2 across the simulated Internet until the site-to-site VPN connection is created.
Configuring a PPTP-based Site-to-Site VPN Connection
To create a PPTP-based VPN connection, perform the following tasks:
1. Configure VPN on the answering router.
2. Configure the demand-dial interface on the answering router.
3. Configure VPN on the calling router.
4. Configure the demand-dial interface on the calling router.
5. Confirm remote access policy configuration on the answering and calling routers.
6. Initiate the VPN connection.
7. Test the VPN connection.
Configure VPN on the answering router (ROUTER1)
1. On ROUTER1, click Administrative Tools, and then click Routing and Remote Access.
2. In Routing and Remote Access, right-click ROUTER1 (local) in the console tree, and then click Configure and Enable Routing and Remote Access.
3. The Routing and Remote Access Server Setup Wizard appears. Click Next.
4. On the Configuration page, select Remote access (dial-up or VPN), as shown in the following figure.

5. Click Next. On the Remote Access page, select VPN, as shown in the following figure.

6. Click Next. On the VPN Connection page, select To the Internet, and then verify that the Enable security on the selected interface by setting up static packet filters check box is selected, as shown in the following figure

7. Click Next. On the IP Address Assignment page, select From a specified range of addresses, as shown in the following figure

8. Click Next. On the Address Range Assignment page, click New, as shown in the following figure

9. In the New Address Range dialog box, do the following:
a. In the Start IP address box, type 172.16.100.1.
b. In the End IP address box, type 172.16.100.2.
c. In the Number of Addresses box, accept the displayed value of 2, as shown in the following figure.

10. Click OK. On the Address Range Assignment page, click Next.
11. On the Managing Multiple Remote Access Servers page, select No, use Routing and Remote Access to authenticate connection requests, as shown in the following figure.

12. Click Next. On the Completing the Routing and Remote Access Server Setup page, click Finish.13. Click OK to close the message box prompting you to configure the DHCP Relay Agent. For this scenario the DHCP Relay Agent will not be configured.
Configure the demand-dial interface on the answering router (ROUTER1)
1. In the Routing and Remote Access snap-in, expand ROUTER1, and then right-click Network Interfaces.
2. Click New Demand-dial Interface to open the Demand-Dial Interface Wizard, and then click Next.
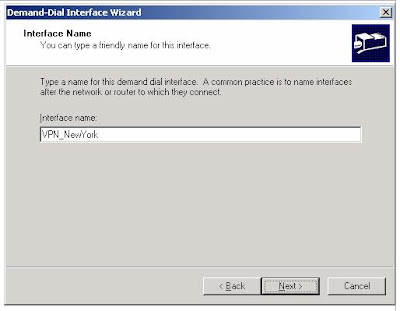
3. On the Interface Name page, type VPN_NewYork, as shown in the following figure. The interface name must match the user account name of the calling router.
4. Click Next. On the Connection Type page, select Connect using virtual private networking (VPN), as shown in the following figure.
 5. Click Next. On the VPN Type page, select Point-to-Point Tunneling Protocol (PPTP), as shown in the following figure
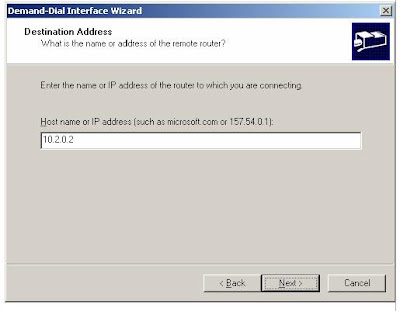
 6. Click Next. On the Destination Address page, type 10.2.0.2 in the Host name or IP address box, as shown in the following figure.
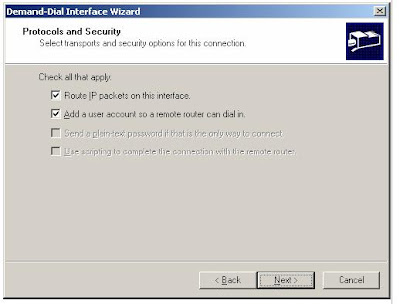
7. Click Next. On the Protocols and Security page, do the following:
a. Select Route IP packets on this interface.
2. Click New Demand-dial Interface to open the Demand-Dial Interface Wizard, and then click Next.
3. On the Interface Name page, type VPN_NewYork, as shown in the following figure. The interface name must match the user account name of the calling router.

4. Click Next. On the Connection Type page, select Connect using virtual private networking (VPN), as shown in the following figure.
 5. Click Next. On the VPN Type page, select Point-to-Point Tunneling Protocol (PPTP), as shown in the following figure
 6. Click Next. On the Destination Address page, type 10.2.0.2 in the Host name or IP address box, as shown in the following figure.
7. Click Next. On the Protocols and Security page, do the following:
a. Select Route IP packets on this interface.
b. Select Add a user account so a remote router can dial in, as shown in the following figure.
8. Click Next. On the Static Routes for Remote Networks page, click Add, as shown in the following figure.
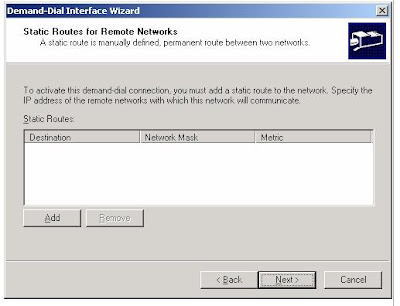
9. In the Static Route dialog box, do the following:
a. In the Destination box, type 172.16.56.0.
b. In the Network Mask box, type 255.255.255.0.
c. In the Metric box, accept the displayed value 1, as shown in the following figure.
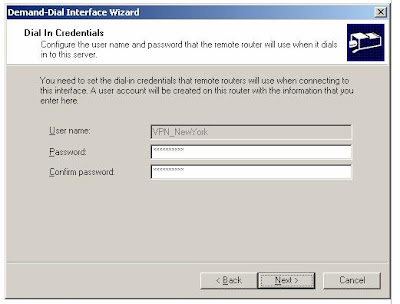
 10. Click OK. On the Static Routes for Remote Networks page, click Next.11. On the Dial In Credentials page, type a password for the VPN_NewYork user account, and then retype the password in the Confirm password box. The User name box is automatically populated with the value VPN_NewYork
12. Click Next. On the Dial Out Credentials page, do the following:
a. In the User name box, type VPN_Seattle.
b. In the Domain box, type ROUTER2.
c. In the Password box, type a password for the VPN_Seattle user account.
d. In the Confirm password box, retype the password for the VPN_Seattle user account, as shown in the following figure.

13. Click Next. On the last Demand-Dial Interface Wizard page, click Finish.

8. Click Next. On the Static Routes for Remote Networks page, click Add, as shown in the following figure.

9. In the Static Route dialog box, do the following:
a. In the Destination box, type 172.16.56.0.
b. In the Network Mask box, type 255.255.255.0.
c. In the Metric box, accept the displayed value 1, as shown in the following figure.
 10. Click OK. On the Static Routes for Remote Networks page, click Next.11. On the Dial In Credentials page, type a password for the VPN_NewYork user account, and then retype the password in the Confirm password box. The User name box is automatically populated with the value VPN_NewYork
12. Click Next. On the Dial Out Credentials page, do the following:
a. In the User name box, type VPN_Seattle.
b. In the Domain box, type ROUTER2.
c. In the Password box, type a password for the VPN_Seattle user account.
d. In the Confirm password box, retype the password for the VPN_Seattle user account, as shown in the following figure.

13. Click Next. On the last Demand-Dial Interface Wizard page, click Finish.
14. Click OK to close the message box prompting you to configure the DHCP Relay Agent. For this scenario the DHCP Relay Agent will not be configured.
Configure VPN on the calling router (ROUTER2)
1. On ROUTER2, click Administrative Tools, and then click Routing and Remote Access.
2. In Routing and Remote Access, right-click ROUTER2 (local) in the console tree, and then click Configure and Enable Routing and Remote Access.
3. The Routing and Remote Access Server Setup Wizard appears. Click Next.
4. On the Configuration page, select Remote access (dial-up or VPN), and then click Next.
5. On the Remote Access page, select VPN, and then click Next.
6. On the VPN Connection page, select To the Internet, verify that the Enable security on the selected interface by setting up static packet filters check box is selected, and then click Next.
7. On the IP Address Assignment page, select From a specified range of addresses, click Next, and then on the Address Range Assignment page, click New.
8. In the New Address Range dialog box, do the following:
a. In the Start IP address box: type 172.56.200.1.
b. In the End IP address box, type 172.56.200.2.
c. In the Number of Addresses box, accept the displayed value of 2, and then click OK.
9. On the Address Range Assignment page, click Next.
10. On the Managing Multiple Remote Access Servers page, select No, use Routing and Remote Access to authenticate connection requests. Click Next.
11. On the Completing the Routing and Remote Access Server Setup page, click Finish.
12. Click OK to close the message box prompting you to configure the DHCP Relay Agent.
Configure the demand-dial interface on the calling router (ROUTER2)
1. In the Routing and Remote Access snap-in, expand ROUTER2 (local), and then right-click Network Interfaces.
2. Click New Demand-dial Interface to open the Demand-dial Interface Wizard. To complete the Demand-Dial Interface Wizard, click Next.
3. On the Interface Name page, type VPN_Seattle. The interface name must match the user account name of the answering router. Click Next.
4. On the Connection Type page, select Connect using virtual private networking (VPN). Click Next.
5. On the VPN Type page, select Point-to-Point Tunneling Protocol (PPTP). Click Next.
6. On the Destination Address page, type 10.1.0.2, and then click Next.
7. On the Protocols and Security page, do the following:
a. Select Route IP packets on this interface.
b. Select Add a user account so a remote router can dial in, and then click Next.
8. On the Static Routes for Remote Networks page, click Add.
9. In the Static Route dialog box, do the following:
a. In the Destination box, type 172.16.4.0.
b. In the Network Mask box, type 255.255.255.0.
c. In the Metric box, accept the displayed value 1, and then click OK.
10. On the Static Routes for Remote Networks page, click Next.
11. On the Dial In Credentials page, type the password for the VPN_Seattle user account, and then retype the password in the Confirm password box. The User name box is pre-populated with the value VPN_Seattle. Click Next.
12. On the Dial Out Credentials page, do the following:
a. In the User name box, type VPN_NewYork.
b. In the Domain box, type ROUTER1.
c. In the Password box, type the password for the VPN_NewYork user account created on ROUTER1.
d. In the Confirm password box, retype the password for the VPN_NewYork user account, and then click Next.
13. On the last Demand-Dial Interface Wizard page, click Finish
Confirm the remote access policy configuration on the answering and calling routers
1. On ROUTER2, in Routing and Remote Access, click Remote Access Policies.
2. In the details pane, right-click Connections to Microsoft Routing and Remote Access server, and then click Properties.
3. On the Settings tab, select Grant remote access permission, and then click OK to save changes.4. Repeat steps 1 through 3 on ROUTER1.
2. In the details pane, right-click Connections to Microsoft Routing and Remote Access server, and then click Properties.
3. On the Settings tab, select Grant remote access permission, and then click OK to save changes.4. Repeat steps 1 through 3 on ROUTER1.
Initiate the VPN connection by performing the following steps on ROUTER2.
Initiate the VPN connection
1. On ROUTER2, in the console tree of the Routing and Remote Access snap-in, click Network Interfaces.
2. In the details pane, right-click VPN_Seattle, and then click Connect.
3. Confirm that the connection state of VPN_Seattle is connected.
1. On ROUTER2, in the console tree of the Routing and Remote Access snap-in, click Network Interfaces.
2. In the details pane, right-click VPN_Seattle, and then click Connect.
3. Confirm that the connection state of VPN_Seattle is connected.
Test the VPN connection
1. On CLIENT2, at the command prompt, type ping 172.16.4.3.
This is the IP address for CLIENT1. Pinging CLIENT1 from CLIENT2 will test whether the Seattle subnet is now reachable.
2. To confirm that the packets crossed the VPN connection, at the command prompt, type tracert 172.16.4.3. Note that you must use the IP address of CLIENT1, rather than its computer name, because a DNS server is not configured in this test lab scenario.
Results that are similar to the following indicate that the connection is working.
Tracing route to 172.16.4.3 over a maximum of 30 hops:
1 <1 ms <1 ms <1 ms [172.16.56.1]
2 1 ms <1 ms <1 ms [172.56.200.2]
3 1 ms 1 ms 1 ms [172.16.4.3]
Trace complete.
Note
172.16.56.1 is the IP address of the ROUTER2 interface that connects to the New York intranet. 172.56.200.2 is the IP address that ROUTER2 assigned to ROUTER1. The presence of this IP address in the Tracert output indicates that packets are moving across the site-to-site VPN connection. 172.16.4.3 is the IP address of CLIENT1.


 Answer: